Trusted Platform Module (TPM in NVIDIA Jetson platforms)
This wiki shows how to implement the fTPM function for NVIDIA Jetson Platforms. This tutorial was tested with a Jetson Orin Nano module running JetPack 6; remember that some steps may vary slightly for other versions of JetPack. It is assumed that JetPack sources were already installed and contained in a directory used to flash the target board initially. It is important to know that the fTPM implementation is based in OP-TEE, so first check out RidgeRun's OPTEE tutorial for Jetson platforms to learn more about it. Additionally, fuse burning is part of this tutorial which requires access to an FSKP package from NVIDIA and is a non reversible operation. Due to this, check RidgeRun's Secure Boot tutorial for Jetson platforms to learn more about fuse burning and FSKP.
Introduction
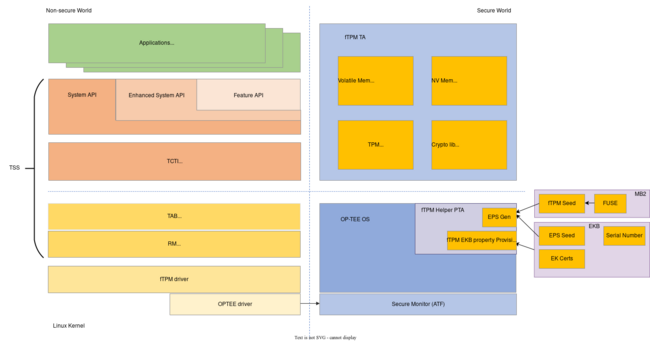
Jetson platforms support a TPM 2.0 compliant Firmware TPM (fTPM) implementation. This implementation works by using a secure application running with OP-TEE. The TA and CA pair make the implementation work, the TA serves as the fTPM module while the CA allows to retrieve data from the fTPM. The following diagram shows the how fTPM implementation:

Implementation
As a first step, follow RidgeRun's OPTEE tutorial for Jetson platforms to ensure the target board has support for OPTEE.
Key generation
During the implementation process several cryptographic keys will be needed, and these keys will be divided in two groups. The first group is used for Secure Boot while the second group is used for the Encrypted Key Blob (EKB) generation. Set the working directory to the path where the Linux for Tegra directory is contained, this tutorial will refer to this directory as BSP_TOP and it should have a structure similar to the following:
BSP_TOP
├── Linux_for_Tegra
Go to the directory and set its path as an environment variable:
export BSP_TOP=$(pwd)
Then generate the first set of keys:
cd $BSP_TOP
mkdir -p odm_keys && cd odm_keys

openssl genrsa -out rsa3k.pem 3072

openssl rand -rand /dev/urandom -hex 32 > sbk-32.key
Generate the second set of keys:
cd $BSP_TOP
mkdir -p oem_keys && cd oem_keys

openssl rand -rand /dev/urandom -hex 32 > oem_k1.key

openssl rand -rand /dev/urandom -hex 32 > sym_t234.key

openssl rand -rand /dev/urandom -hex 16 > sym2_t234.key

openssl rand -rand /dev/urandom -hex 16 > auth_t234.key
Rebuild OPTEE sources
By this point it is assumed you already followed the steps in RidgeRun's OPTEE tutorial for Jetson platforms. OPTEE sources must be rebuild to enable the fTPM feature, to do so, add the -t flag when building the sources:
cd $BSP_TOP/Linux_for_Tegra/source/tegra/optee-src/nv-optee/

./optee_src_build.sh -p t234 -t
After the process is finished, update the TOS image that will be used for your build:
cp tos.img $BSP_TOP/Linux_for_Tegra/bootloader/tos-optee_t234.img
EKB Generation
The first step is to generate the EKB database using KDK-based EK certificates. It is possible to do this using an automated script provided by NVIDIA with the following commands:
cd $BSP_TOP/Linux_for_Tegra/source/optee/samples/ftpm-helper/host/tool

./kdk_gen.py [--oem_id ${OEM_ID}] [--sn ${SN}] [--num_devices ${NUM_OF_DEVICES}]

# Example:
./kdk_gen.py --oem_id 0x21 --sn 0x1000218000 --num_devices 1
With the previous example the database will be generated for only one device using the provided OEM ID and serial number. The script will create a directory called ftpm_kdk containing the files kdk_db_0021-0000001000218000-1.csv and pubkey_db_0021-0000001000218000-1.csv. The content of this files for the example look like the following:
cat kdk_db_0021-0000001000218000-1.csv
0021 0000001000218000 83899b63f8a81b26e7785ed6be3fbaf54d05bf88078efb7cce9b2e7e2b904ed8
# Where the first two columns are oem-id and SN, and the last column is the randomly generated KDK value.

cat pubkey_db_0021-0000001000218000-1.csv
0021 0000001000218000 b789dfc2efce60fd538444c8f80218d8fe696493aec58234d7f4167da047a31c94f0a3f6163c74535f5342881bba15cf5624eb31d0ce5b7c0564dbf1e84c3a67
# Where the first two columns are oem-id and SN, and the last column is the corresponding silicon-id public key.
With the KDK database ready, use the following command to generate the ODM EKB:
./odm_ekb_gen.py --kdk_db ftpm_kdk/kdk_db_0021-0000001000218000-1.csv
The previous command generates the EK certificates in the ftpm_out directory and the ODM EKB in the odm_out directory. Now generate the signed EKB using the previously generated keys:
cp ../../../hwkey-agent/host/tool/gen_ekb/gen_ekb.py ./
./oem_ekb_gen.py -oem_k1_key $BSP_TOP/oem_keys/oem_k1.key \
                  -in_sym_key $BSP_TOP/oem_keys/sym_t234.key \
                  -in_sym_key2 $BSP_TOP/oem_keys/sym2_t234.key \
                  -in_auth_key $BSP_TOP/oem_keys/auth_t234.key \
                  -in_ftpm_odm_ekb odm_out

# The outputs from the above command are stored at the oem_out Directory. Copy this directory to the BSP_TOP directory.
cp -r oem_out/ $BSP_TOP
Then, to sign the generated image and EKB to comply with the secure boot fuses that will be burned execute the following commands:
cd $BSP_TOP/Linux_for_Tegra
./l4t_sign_image.sh --chip 0x23 \
                     --key ../odm_keys/rsa3k.pem \
                     --encrypt_key ../odm_keys/sbk-32.key \
                     --mass-ekb ../oem_out \
                     --type data \
                     --split False
Fuseblob Generation
This section shows how to generate the required Fuseblob for the fTPM implementation and how to executed the fuse burning process using the FSKP tool. To learn more about fuse burning check RidgeRun's Secure Boot tutorial for Jetson platforms.


